Centering a title in WordPress can enhance the visual appeal of your website by creating a balanced and clean design.
The process is straightforward and flexible, using custom CSS, theme options, or a page builder plugin.
This guide will walk you through simple methods to achieve this, ensuring your site remains responsive and user-friendly.
Method 1: Using the WordPress Theme Customizer
The WordPress Theme Customizer is one of the most straightforward and beginner-friendly methods for customizing your website headers.
It allows you to make changes to your site in real time and immediately preview the results before saving them. Follow these steps to get started:
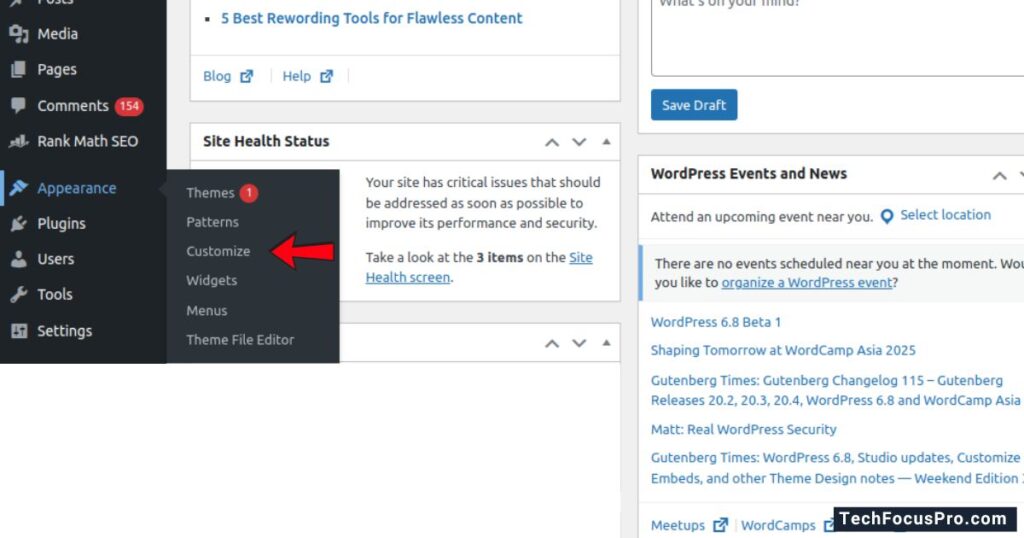
Access the Customizer
Begin by logging in to your WordPress dashboard. Navigate to the Appearance section in the sidebar menu and click on Customize. This will open the Theme Customizer in a new interface.
Locate the Header Settings
Inside the Customizer, you’ll see a list of sections you can modify, such as Site Identity, Colors, and Menus. Look for the section labeled Header or Header Settings. The naming may vary depending on the theme you are using.
Modify the Header Elements
Once you’re in the Header section, you can adjust various elements. Common options include:
- Logo and Site Title: Upload a new logo or edit the site title and tagline.
- Header Layout: Choose from layout options, such as centered, left-aligned, or split layouts.
- Colors and Fonts: Adjust the colors and typography of the header text to match your branding.
- Navigation Menu: Some themes allow adding or rearranging menu items directly within the header settings.
Preview and Save Changes
The Customizer provides a live preview panel so you can see how your site looks as you edit it. Once you’re happy with the changes, click the Publish button to save them and apply them to your live site.
The WordPress Theme Customizer is an excellent choice for users who want to make quick and user-friendly adjustments without touching any code.
However, remember that the options available in the Customizer are theme-dependent, so more advanced customization might require additional tools or methods.
It is always recommended to back up your site before making significant changes to ensure you can revert to its original state if needed.
Read More:- How SEO and Web Design Work Together
Method 2: Adding Custom CSS
Adding Custom CSS to your WordPress site allows you greater flexibility and control over its design and Appearance.
This method is ideal for users with a basic understanding of CSS who want to implement more advanced design changes that may not be available through the Theme Customizer. Here’s how you can add Custom CSS to your WordPress site:
Access the Customizer
Navigate to your WordPress dashboard and go to Appearance> Customize. This will open the Theme Customizer, which includes an option for adding custom CSS.
Locate the Additional CSS Section
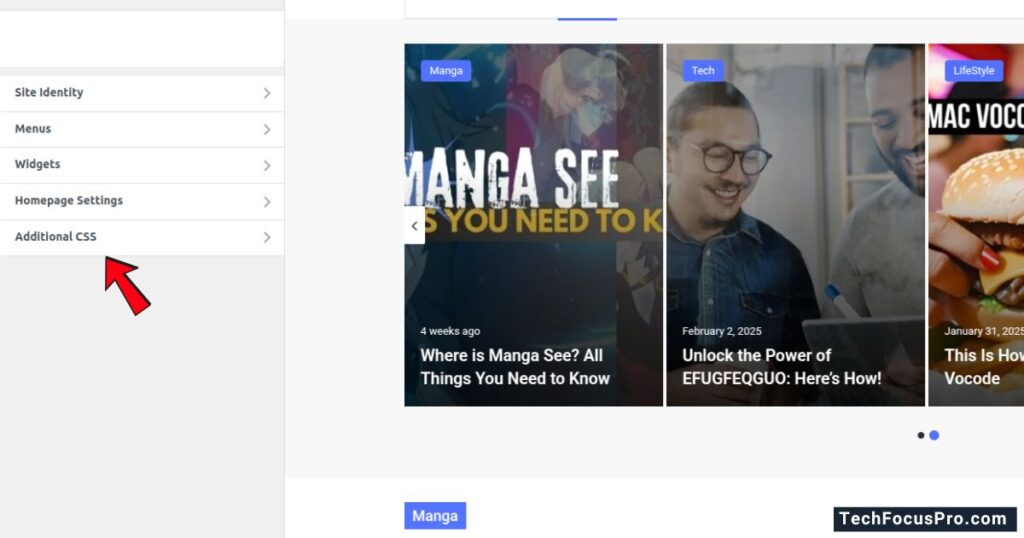
Within the Customizer, look for the Additional CSS option in the menu. Clicking on it will open a text editor where you can input your CSS code.
Write or Paste Your CSS Code
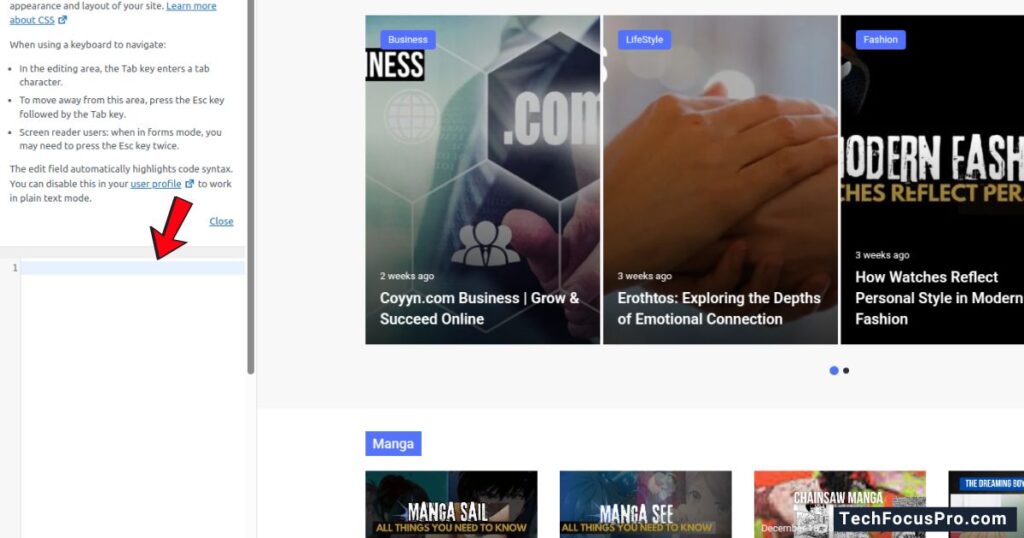
Use the text editor to write new CSS rules or paste pre-written CSS code. This code can target specific elements of your site, such as background colors, font sizes, margins, or padding. For example:
“`css
body {
font-family: Arial, sans-serif;
line-height: 1.6;
}
.header {
background-color: #f4f4f4;
padding: 20px;
}
“`
Write clean, valid CSS to ensure compatibility and avoid errors.
Preview the Changes Live
The Customizer provides a live preview, showing how your CSS edits affect your site in real-time. This feature helps ensure that your styling adjusts as intended across different sections.
Save Your Changes
Once satisfied with the new design, click the Publish button to save your CSS. These changes will now be applied to your live site.
Method 3: Using a WordPress Plugin
If you’re uncomfortable working directly with code, using a WordPress plugin to add Custom CSS is an excellent option. It simplifies the process and allows you to manage your customizations without modifying theme files or worrying about breaking your site. Here’s how this method works:
Read More:- Top Free WordPress Plugins to Enhance Your Site’s Functionality
Choose a Plugin
Several plugins are available specifically designed to add CSS to your WordPress website. Popular options include Simple Custom CSS, SiteOrigin CSS, and CSS Hero.
These user-friendly plugins have added features like visual editors and syntax highlighting.
Install and Activate the Plugin
Navigate to your WordPress dashboard, go to Plugins > Add New, and search for the CSS plugin of your choice. Click Install Now, and activate the plugin once the installation is complete.
Access the Plugin Interface
After activation, the plugin usually adds a new menu item or option to the WordPress dashboard. Click on it to open the interface where you can write your CSS. Many plugins offer a live preview option, allowing you to see your changes in real time.
Add Your Custom CSS
Enter your desired CSS code into the editor provided by the plugin. Plugins often have useful features like code validation, error highlighting, and even pre-built styling examples to help you get started.
Save Your Changes
Once you’ve added and reviewed your CSS, click the Save or Publish button to apply your changes across your site. The plugin ensures that your custom styles remain intact even if you switch themes or update WordPress.
Using a plugin offers a no-hassle solution for users who may not be well-versed in coding. It also provides a centralized, safe environment to manage all your styles without affecting your core theme files or risking unintended errors.
While it’s not as lightweight as directly adding CSS through the Customizer or theme files, the added features and user-friendly experience make this method highly appealing.
Troubleshooting
If your custom CSS isn’t working as expected, don’t worry—there are a few simple steps you can take to fix the issue.
- Check for Typos: A small error in your code, like a missing bracket or semicolon, can cause problems. Review your CSS carefully to ensure everything is written correctly.
- Clear Your Cache: Sometimes, your browser or site might load an older page version. Clear your browser cache or the cache from any caching plugins you use to ensure you’re seeing the most recent changes.
- Verify Plugin Activation: Make sure the plugin you’re using for custom CSS is active and properly configured. If it’s not enabled, your styles won’t be applied.
- Inspect with Developer Tools: Use the browser’s built-in developer tools to check if your CSS is being applied. Right-click on your webpage, select “Inspect,” and look under the “Styles” section to see if your custom code appears.
- Rule Conflicts: If another CSS rule, like one from your theme or an additional plugin, overrides your custom styles, try using it! Important to prioritize your code (e.g., color: red ! important;).
Following these steps, you can quickly identify and resolve most issues, ensuring your custom CSS works perfectly on your site.
FAQs
How can I center a title in WordPress without any coding?
Using a WordPress block editor (Gutenberg), you can center the title directly by selecting the text block and the “Center Align” option from the block toolbar. This method does not require any coding knowledge.
Can I use custom CSS to center my title in WordPress?
Yes, you can use custom CSS. Go to your WordPress dashboard, then “Appearance” > “Customize” > “Additional CSS,” and add the following code:
“`
h1 {
text-align: center;
}
“`
This will center all H1 titles on your site. Add a unique class or ID to the CSS rule to target a specific title.
What if my theme doesn’t allow centering through its default options?
Install a plugin like “Simple CSS” or “Theme Editor,” which lets you add custom CSS. Alternatively, you can modify the theme’s style.css file directly, but ensure you back up your site first to avoid unintended changes.
Can I center the title in WordPress using a page builder plugin?
Absolutely! Popular page builders like Elementor or WPBakery allow you to customize text alignment, including centering titles, with an easy-to-use interface.
Will centering the title affect my site’s responsiveness?
When implemented correctly, centering a title will not impact responsiveness. Use percentage-based or relative CSS units to adjust the title to different screen sizes. Most modern themes and plugins handle this automatically.
Can you center titles only on specific pages?
You can use custom CSS to target specific pages using their unique body class or page ID. For example:
“`
.page-id-123 h1 {
text-align: center;
}
“`
Replace “123” with the actual page ID. This ensures the title centers only on that particular page.
Conclusion
Concentrating on a title in WordPress may be difficult, but a few simple techniques might help. You can ensure your title appears precisely as you want it to by using custom CSS, confirming that styles are applied correctly, and resolving the typical problems mentioned above. Attention to detail and a methodical approach are crucial, whether you’re utilizing custom code or the built-in choices of a theme. These strategies will give you total control over the appearance of your website and help you get the polished, businesslike appearance you desire.